So what is Blocking?
Blocking makes sure all you granny squares are the same size and shape, so when you join them together they match up perfectly to achieve the very best finish.
For beautifully neat and perfectly ‘square’ Granny squares, I would recommend ‘Blocking’ them before joining them.
Below I will show you several ways to Block your Granny squares
Demonstration shows the making of my Dolly Daisy Blanket pattern :-)

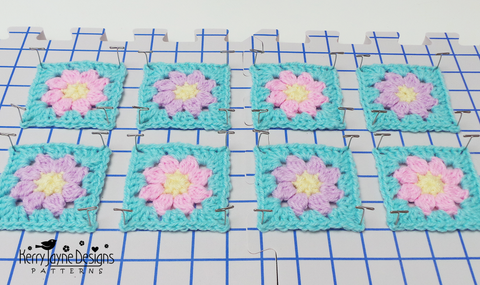
Above I have used a wooden granny square blocking board. The metal pegs can be moved around enabling you to block different size squares. Spray each square with water from a misting bottle before blocking.
Here, I am using a foam blocking pad, you can use the gridlines to measure and pin out your damp granny squares with T shaped blocking pins. Leave then to dry naturally before joining together :-)

If you do not own a blocking board or foam pad, any padded surface covered with a towel will do, such as the ironing board or perhaps a covered footstool.
Once your blocking area is prepared, spray the granny squares with water from a misting bottle, pin out squarely and leave to dry naturally.

It is not essential to block the Granny squares, but it does help to achieve a beautiful finish. Some people prefer to join the squares first and then block the whole blanket when finished.

I hope you have enjoyed my tutorial. If you would like to try your hand at making my Dolly Daisy Blanket you can find the crochet pattern Here
You can see How to Block the whole blanket and other crocheted items Here
See more of my helpful crochet tutorials Here